Friday, March 24, 2017

Happy Power Poppy Friday~ March 24, 2017!


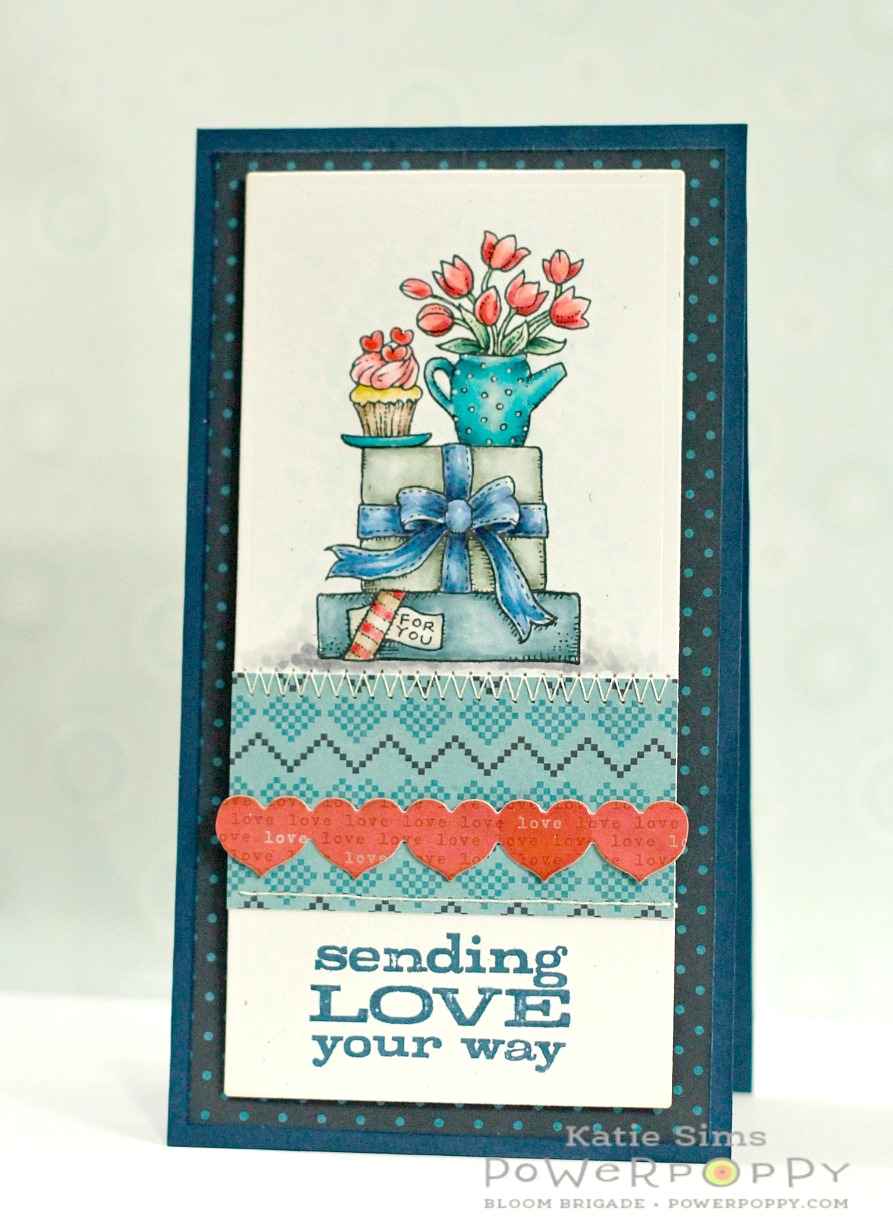
Hello there and a very happy Friday to you!  I hope you have had a wonderful week....and YAY, it's time for the weekend!!  :)  I thought I would share a little card with you using Power Poppy's new stamp set Loving Tulips.  


I just l-o-v-e this little pitcher of tulips!  For my card shape, I decided to use a Spellbinder's die cut for my main panel and I built the card around that shape.  I added patterned paper to either end and stamped my image.  Next, I added the stitching.  I colored my image with Copics, including a second tulip for the one that was cut off by my patterned paper on the left.  I simply fussy cut that bloom and added her with a glue dot.  I stamped my sentiment on some dark gray card stock with Versamark ink and heat embossed it with some white embossing powder.  Next, I used a trimmer to give me a little banner and adhered it to my image panel.  The only thing left was to adhere my assembled image panel to a dark gray card base.  This card measures 3" x 6".


I cannot tell you how fun these tulips are to color!  Well...I could....OR you could just go ahead and find out for yourself by grabbing this awesome set, and then report back to the group!  ;) 


And here's hoping your day absolutely blooms.....and your weekend!  Well, that is all for my card today, but several of those incredibly creative Bloomie sisters of mine have some pretty sweet cards to share as well.  Make sure you leave them a little blog love when you visit.  OH, and hey.....if you haven't entered Power Poppy's March Power & Spark challenge yet, c'mon!  There is still a little time left and you could win a prize!!  Check out the details from the link above and come play!  :)  

I am so glad you were able to stop by for a visit and I hope to see you around here again, soon.  Until then....take care!  

Julie Koerber  
Katie Sims <------You are here 
Stacy Morgan 
Tosha Leyendekker

~Katie

Supplies not listed above:  Paper-PTI's Rustic Cream and Smokey Shadow card stocks, patterned papers from MME's Lost & Found Two "Sunshine" 6x6 paper pad; Ink-Memento's Tuxedo Black, Versamark ink; Other-Sakura Glaze pen, Wink of Stella clear brush pen, white embossing powder, Spellbinders Long Classic Rectangles Large die set, and these Copic colors- W0, W2, W5, W7, T1, BG000, BG10, BG11, BG13, YG21, YG23, YG61, YG63, YG67, G28, Y11, Y13, Y15, Y19, Y26, Y35, and E35.

Tuesday, March 14, 2017

Power Poppy March Stamp Release~Day 5!


Hello there and welcome back for the final day of the Power Poppy Spring Fling stamp release!  Have you been following all of the activity over on the Power Poppy blog?  Today is the day that all of the stamp sets will be available for purchase and also the day that you can pre-order coordinating dies for some of the stamps for this release!  But wait...before you jet on over to the Power Poppy store, can I show you my card?  :)  For today's hop, we were able to choose any of the new sets including the new Tiger Lily XL stamp that is being featured today!  


*Actually, this image is already quite famous...the lovely Kathy Racoosin of The Daily Marker colored her up beautifully to herald in her newest 30 Day color challenge.  You can see that post here.  :)

So, I thought I would use the new Succulent Singles set that was previewed this past Saturday for my card today....


I used two of the images and one of the sentiments from this darling set.  I started by die cutting my circle from white card stock and then die cutting some patterned paper from the same die.  I trimmed the patterned paper and stitched it to my white card stock circle.  Next, I stamped one of the shoots ( I guess it's a shoot...or maybe a tendril....or a branch?, no...it doesn't look like a branch...oh well, I think you get the general idea here) a few times then stamped my single succulent on another piece of card stock.  I colored up all of the images with Copics then fussy cut the succulent image.  Then, I stamped my sentiment using my MISTI...seriously love this tool!  :)  

Once I had adhered my fussy cut image to my panel with foam tape, I die cut a little leafy sprig, covered it in glitter and tucked it under the succulent to add a bit of filler. I liked that so much, I added glitter to the little shoots we talked about a minute ago.  I didn't want to leave my main image shimmer-less so I added a little sparkle with my Wink of Stella clear brush pen.  Once everyone was sparkly, I adhered my assembled panel to my card base.  I doubled up the scalloped circles to make it look a little fuller.  :)


She really does look like one cool chick, doesn't she?  I just love all of the little images in this set....so many possibilities for adding details!  


And one last little look see at the lovely detail in Marcella's images.  That succulent looks so dimensional, but I promise...it is flat!  I did not do any kind of paper piecing here at all.  Thanks to Marcella's shading cues...this little lady was a cinch to color up!  :)

So that is all for my card today, but my Bloomie sisters have some truly amazing projects to share with you today.  Make sure you leave them a little blog love while you visit, and then head on over to the Power Poppy store to shorten that "must have" list you have been making the last few days....:) 

 I hope you have enjoyed this release as much as we have enjoyed sharing all of our projects with you!  It has been so much fun having you visit and reading your sweet, encouraging comments really has made my week!  Thank you so very much for your kindness and I look forward to seeing you again soon.  Until then, take care!  :)


Julie Koerber 
Kathy Jones 
Katie Sims <------You are here 
Stacy Morgan 
Tosha Leyendekker

~Katie

Supplies not listed above:  Paper-PTI's Rustic White and Enchanted Evening card stocks, patterned paper from lilybeedesign's "Double Dutch" 6x6 paper pad; Ink-Memento's Tuxedo Black ink, Versafine's Onyx Black ink (sentiment): Other-Scalloped circle die from Spellbinders, Cross Stitch circle die from My Favorite Things, Sprig die from Marianne Design, Martha Stewart fine glitter, foam tape, glue dots, and these Copic colors: BG70, BG72, BG75, BG78, B60, B63, and B66.

Monday, March 13, 2017

Power Poppy's March Stamp Release~Day 4!


Hello there and happy Monday to you!  So glad you could stop in for Day 4 of Power Poppy's Spring Fling stamp release.  Today's sneak peek is featuring two stamp sets.  You can see more details about the sets over on the Power Poppy blog.  For my card today, I chose to use the incredibly beautiful set, Artful Display...


Just wait til you see all of the little doodads and goodies packed in to this set!  I remember when I first saw these images, I knew I would just have to color up that darling Staffordshire dog figurine first...and that is just what I did!   


When you get this set, might I suggest you just go ahead and stamp out everything....'cause you are going to want to play with all of the little bits. :)  Ok, so I decided on a couple of the plates and my dog and colored everything up with Copics.  Next, I fussy cut the pieces and set them aside so I could build my "feature wall"...hee....can you tell I really had fun?!  I used a stitched square die from My Favorite Things to get things started and used a bit of patterned paper for my wall paper.  I added some stitching then stamped my sentiment.  I layered my "wall" with some more patterned paper, added some gold leafing, then adhered everything to another die cut layer from a dark grey card stock.  Then came the really, really  fun part....I arranged all of my fussy cut pieces on the wall!  

Here's a little something extra I like to do sometimes on my cards...I will use a mix of foam tape and glue dots to give varying dimension.  That is what I did here...I used foam tape for my dog image and then I used glue dots (which tend to be a little thinner than the tape) for my plates.  I know...minor detail, but I really like the way it ends up looking.  :)  Next, I adhered my assembled card front to a simple card base.  This card measures 4 1/2" square.


To up the sparkle factor, I not only used my Wink of Stella clear brush pen but I also used an Atyou Spica pen in gold for the dog collar and chain.  I also used a Sakura white glaze pen to give a few of the flowers white centers.  


And here is one last view of Marcella's beautiful handiwork...I sure do love her style!  I can most assuredly tell you that you are going to l-o-v-e coloring these precious images up...yep!  And then you get to play "decorate my wall" and design your own "Artful Display".  Doesn't that sound like fun?!!

So that is all for my card today, but my Bloomie sisters have some real treasures for your card and coloring inspiration, so make sure you check out all of that creative goodness, leave them a little blog love while you are there, and then if you haven't already....skedaddle on over to the Power Poppy blog to see the festivities over there.  I hope you will be able to stop back by tomorrow for the final day of the Spring Fling stamp peeks and the day when stamps will be available for order.  You will also be able to pre-order those dies that Marcella has been teasing you with....yay!  Thank you so much for your visit and hope to see you soon.  Until then...take care!  :)


Julie Koerber 
Kathy Jones 
Katie Sims <------You are here 
Stacy Morgan 
Tosha Leyendekker

~Katie

Supplies not listed above:  Paper-Rustic White and Smokey Shadow card stocks from PTI, red patterned paper from My Mind's Eye's Lost & Found "Ruby" 6x6 paper pad, gray patterned paper from scrap: Ink-Smokey Shadow, Vintage Cream, Chamomile and Chai inks all from PTI, Memento's Tuxedo Black ink; Dies-MFT's Stitched Squares die, Marianne Design's  Petra's Square Frames die; Other-  Scor Tape, foam tape, glue dots, Krylon 18 KT Gold Leafing pen, and these Copic colors:  G0000, G00, G02, G05, G09, G19, YG61, YG63, YG67, R11, R12, R14, R17, R29, E0000, E40, E42, E44, E49, Y18, Y26, W0, W2, W4, W5, W7, and W10.

Sunday, March 12, 2017

Power Poppy's March Stamp Release~Day 3!


Hi there and welcome back for Day 3 of Power Poppy's Spring Fling stamp release!  I sure hope you have been enjoying the festivities thus far...but there is a whole bunch more for you to see.  Today is another "Two-fer" with two more glorious stamp sets being previewed today.  For my card, I chose to use the stamp set Loving Tulips...


I am betting you recognize this sweet image!  This wildly popular digital image is now available as a stamp and has some really darling and loving sentiments to go with it. :) OH, and hey....did you happen to notice that this set will have some coordinating dies available for pre order?  Uh huh...it's true!  You can see all of the details on the Power Poppy blog in this post.  I wanted to use the dotty "Hello" sentiment with the pitcher of tulips, so....


I started by die cutting my sentiment panel out of white card stock.  After fiddling around with different angles for the sentiment, I finally opted for the upper right corner.  After a little measuring, I stamped the sentiment then trimmed my green patterned paper to fit the sentiment panel.  *I will say that I did do a little dry fit with my oval die to make sure it would fit before I trimmed my paper.*  Once all of the layout decisions had been muddled through, I stamped my sentiment on my die cut oval and again on a scrap piece of the same card stock so I could do a little paper piecing.  I colored my images with Copics and then fussy cut the pitcher with a few of the tulips and pieced it on the oval panel.  After adding a little shimmer with my Wink of Stella clear brush pen, I adhered the image to my sentiment panel.  It was then that I decided it needed "one more thing" so I added a bit of pink patterned paper to the bottom of the assembled image panel.  Lastly, I adhered everything to a white card base.  This card measures 4" x 5 1/8".


Gotta love tulips in the Spring, right?  Actually, I am quite sure I would love them any time!  :)  Now, I am not sure if you noticed here but there is not a button or ribbon on this card anywhere.  Actually this makes the second card in a row....spooky.  ;)


That is one sweet "hello", don't you think?  How Marcella comes up with these little details is beyond me!  This set has been loads of fun to play with, and I just know you will love it too!  :)

So that is all for my card today, but you simply must check out what my amazing Bloomie sisters have created for your inspiration.  Make sure you leave them a little blog love while you are there and then please try to stop back by tomorrow for Day 4 of Power Poppy's March stamp release.  Oh, if you haven't seen the wonderfully inspiring posts on the Power Poppy blog this week....you really should! Lots of good stuff there!  :)  Hope to see you soon....until then, take care!


Julie Koerber 
Kathy Jones 
Katie Sims <------You are here 
Stacy Morgan 
Tosha Leyendekker

~Katie

Supplies not listed above:  Paper-Rustic White card stock from PTI, Green patterned paper from lilybeedesign's "Double Dutch" 6x6 paper pad, pink patterned paper from scrap; Ink-Memento's Tuxedo Black (for image) and PTI's Smokey Shadow (for sentiment); Other- Spellbinders rectangle die from A2 Matting Basics B set, My Favorite Things Cross Stitch oval die and these Copic colors: G29, YG21, YG23, YG25, YG61, YG63, YG67, YG91, RV0000, RV21, RV23, RV25, RV29, BV0000, BV01, E0000, E40, E44, C2, C4, C5, C7, C9, T2, and T4.

Saturday, March 11, 2017

Power Poppy's March Stamp Release~Day 2!


Hi there....so happy to see you back!  Did you enjoy all of the festivities over on the Power Poppy blog yesterday?  That Marcella really knows how to celebrate Spring, doesn't she?  :)  Now try to contain yourself with what I am about to tell you.....today's release is showcasing two new stamp sets!  I know!  Two in one day....pretty awesome, right?!  For my card today, I chose to use the new stamp set, Burst of Kindness


Now, this beauty may look familiar to you....that is because the main image debuted as a digital image for purchase a while back but by popular demand....she is back, newly accessorized and available as a stamp set!  


I started by stamping my image with Memento's Tuxedo black ink, die cutting my image out then stamping my sentiment with Versafine's Onyx Black ink.  After using a ton of Copics to color my image, I added some gold leafing to the edges with my Krylon 18KT Gold Leafing pen and some shimmer with my Wink of Stella clear brush pen then set the panel aside.  I die cut a panel of blue card stock, stitched some patterned paper to it, layered my colored image panel with a scalloped die cut of white card stock and adhered it to my stitched panel.  I used foam tape to add some dimension.  Lastly, I adhered the assembled panels to a card base.  This card measures 4 1/8" x 5 3/8".


Do you ever wonder how on earth Marcella packs all of that glorious detail in to each of her images?  Yeah....me too...all the time.  :)


And here is one last lookie at that lovely image and the super sweet sentiment.  She really was so much fun to color up and I know you will enjoy it too!  :)  

So that is all for my card today, but you know my incredibly talented Bloomie sisters are bringing it, B-I-G TIME...so make sure you check out all of the floral goodness, leave a little blog love while you are there, then make plans to join us again for Day 3 of Power Poppy's Spring Fling stamp release.  Yay!  So looking forward to seeing you again soon...until then, take care!  :)

Julie Koerber 
Kathy Jones 
Katie Sims <------You are here 
Stacy Morgan 
Tosha Leyendekker

~Katie

Supplies not listed above:  Paper-Rustic White and Enchanted Evening card stocks from Papertrey Ink, patterned paper from lilybeedesign's "Double Dutch" 6x6 paper pad; Other- Stitched Mini Scalloped Rectangles and Cross Stitch Rectangle die sets by My Favorite Things, A2 Matting Basics B die set by Spellbinders, and these Copic colors-  B0000, B000, B02, B91, B93, B99, G28, G40, G43, G46, YG21, YG25, YG93, YG97, YR02, YR18, YR21, YR24, YR31, R01, R05, R14, R17, RV21, RV23, RV25, RV29, V01, V22, V25, V28, BV08, and E99.

Friday, March 10, 2017

Power Poppy's March Stamp Release~Day 1!


Hello, hello, hellooo! I am so glad you could pop in today for Day 1 of Power Poppy's March stamp release!  Let me just tell you, Marcella has been at it again and has a stamp release like you will not believe!  Eight, yes....eight new stamp sets will be revealed over the next several days and they are all stunners!  But don't just take my word for it...you can see for yourself today....starting with this darling new stamp set, Natural Beauties.  


Pretty sweet little image, right?  Well, just you wait....I'll bet you will be able to spy them all along the hop today!  For my project, I chose to use the wee little trillium with mushrooms for my main image and then used the lily of the valley and star flower along with the trillium for some background stamping.  My idea was to make a gift bag using a simple brown paper bag.  I like to use these for gift cards.  :)


So I started by stamping my bag with my background images.  Next, I went to work on my belly band to hold the bag closed.  I started with a tag die cut, stamped my sentiment and  trillium and colored it with Copics.  After some distress inks, and some added detail with a Sakura white glaze pen and a Wink of Stella Clear brush pen it hit me that I could turn this tag in to a mushroom.  So, I cut out the mushroom top using some red card stock and an oval die.  I cut both ends off the oval to serve as the front and back of my mushroom cap.  Next, I took a couple of circle punches to add the spots to my mushroom cap then added some white card stock in between the front and back layers.  I added the assembled mushroom cap to my tag to form the mushroom stem.  All that was left was to add the ribbon and button to a strip of patterned paper and then attach the assembled mushroom.


Just look at those teeny tiny little mushrooms!  They are so adorable, don't you think?  I did add some shimmer to the centers of my punched dots on the mushroom cap with the Wink of Stella pen but I am not sure if you can see it in the photos.  


One last look at these darling images.  Don't you just love wee images that you can use on tags?!  The detail on all of these are really incredible!  

Ok, so now that I have shown you my project I can't wait for you to see what my Bloomie sisters have created for your inspiration! Oh, the beautiful cards you will see....truly.  :)  I thank you for your visit today, and I hope that you will stop back by tomorrow for Day 2 of our Spring Fling stamp release!   Until then, take care!  

**Oh, oh.....I can't believe I almost forgot to share a little tidbit that I know you are going to l-o-v-e....Marcella will be offering coordinating dies for some of the stamp sets this release! How exciting is that?!  Stay tuned on the Power Poppy blog for more intel on this amazing development at Bloom Central!  ;)  

Cindy Lawrence    
Julie Koerber 
Kathy Jones 
Katie Sims <------You are here 
Stacy Morgan 
Tosha Leyendekker

~Katie

Supplies not listed above:  Paper- PTI Rustic White and Pure Poppy card stock, green patterned paper from scrap box; Ink- Memento's Tuxedo Black, PTI's Chai and Chamomile, PTI's Dark Chocolate, Versafine Onyx Black, Ranger Distress Ink in Frayed Burlap; Other- paper bag from Stampin' Up!, ribbon and button from PTI, oval die from Spellbinders, tag die from PTI, circle punches from Stampin' Up!, Stampin' Up! spritzer tool with Crumb Cake and Early Espresso markers, and these Copic colors: R22, R24, R29, G40, G43, G46, G28, E40, E41, E44, E47, E50, E51, E55, E57, B0000, B000, C1, C3, and C5.

Friday, March 3, 2017

Are You Ready for Power Poppy's March Power & Spark Challenge?


Hi there and Happy Friday to you!  I am so glad you could stop by today.  It is time for Power Poppy's March Power & Spark challenge and I get to be the hostess this month!  So can you guess what the theme is? ;)  Let's take a peek at the details, shall we?


Yep, Let's Go Green!  I really was inspired by Pantone's 2017 Color of the Year~Greenery.  Here's a little bit about the challenge....

In honor of Pantone’s 2017 Color of the Year choice, “Greenery”,  let’s create projects featuring green!  
Here is an excerpt from Pantone’s  description of “Greenery”…

Greenery is a fresh and zesty yellow-green shade that evokes the first days of spring when nature’s greens revive, restore and renew. Illustrative of flourishing foliage and the lushness of the great outdoors, the fortifying attributes of Greenery signals consumers to take a deep breath, oxygenate and reinvigorate.

Now, doesn’t that sound like a color highlighting the Power Poppy vibe?!  I think so!  So, let’s go wild with green! But, you don’t have to limit yourself to just using the color green!  You can also “Go Green” by using a "recycled" element on your project.  However you choose to play along, just make sure you show us your green!


So, are you up for the challenge?  I hope so, 'cause we would love to have you play along this month....and the best part is, if you share your creation with us on the Power Poppy blog, you could win a prize!  Yay!  :)

So lemme show you my card for the challenge...


There's a bit o'green there, I would say...lol!  I started by printing the darling digital image Wish You Luck on to some Papertrey Ink Rustic White card stock and coloring it up with Copics.  Next, I die cut my image and also some additional die cut layers in a mix of papers.  As you can see, I pulled out the big guns for this one....my highly coveted Marianne Design die set in Anja's Square.  Sigh...yep, I still hear angels sing when I use this one...and now maybe a bagpipe, lol!  

Anyway, I couldn't resist adding some gold leafing with my Krylon 18KT Gold Leafing pen then some shimmer to the shamrock blooms with some Martha Stewart clear glitter.  And because I just had to add the "one more thing"....I added some wee little pearls to the centers of the shamrocks.


One way to really add some dimension when you are coloring up a bouquet of the same bloom is to grab your darkest color that you are using and color in between the blooms.  That will instantly pop out the blooms in the foreground giving you instant depth.  Really...it works like a charm every time!  You could even say, it works like a lucky charm.....hee!  Ok, I couldn't resist that one!  ;)

I sized and printed the sentiment from the same digital set and die cut it with a fishtail banner.  


One last close up to show off Marcella's handiwork.  Isn't it something how she always manages to give us these glorious images and also pairs them up with sweet sentiments in darling fonts?!  I know, right?

Ok, so that is all for my card today, but some of my Bloomie sisters have worked their magic and created cards for your Friday inspiration.  Make sure you check them out and leave them a little blog love while you are there.  Then, c'mon and play along with us!  We would love to see what you create.  I am so glad you were able to visit today and here's wishing you luck on your challenge entry!  Until next time, take care.


~Katie

Supplies not listed above:  Paper-Papertrey Ink's Spring Moss, Graphic 45's "Twelve Days of Christmas" 6x6 paper pad; Other-Spellbinders Standard Circles Large, Classic Scalloped Circles Large, and Blossom Three die sets, Papertrey Inks Tag Sale Quilted die, Ranger Distress Ink in Weathered Wood, PTI's Chamomile ink, and these Copic colors: YG21, YG61, YG63, YG67, G29, V93, BV20, BV23, and BV25.

Thursday, March 2, 2017

Blog Hoppin' with The Daily Marker!


Happy Thursday to you!  I am so glad you could stop by today.  Power Poppy has joined up with the lovely Kathy Racoosin of The Daily Marker and many other wonderful stamp and crafting companies from around the globe for a blog hop extravaganza!  You can read all about it ...

Kathy Racoosin of The Daily Marker is unleashing a world of color on her blog and Instagram (@kathyrac) this month, and she wants all of us to join her in the fun! 


The Daily Marker 30 Day Coloring Challenge energizes us to color something every day — even if only for a few minutes. Whether your love markers or prefer paints, colored pencils or crayons, all media is welcome! CLICK HERE to find out where to share what you are coloring and join the encouraging community of happy colorists. You'll also find answers to questions you may have along the way, participate in contests and more! If you share your work on social media, don't forget the hashtag: #thedailymarker30day and if you use our stamps and digis, add the hashtag #powerpoppy


As if this wasn't excitement enough, just take a lookie at what Marcella has going in honor of this collaborative blog hop...


POWER POPPY GIVEAWAY
To kick off the challenge, Power Poppy’s Marcella Hawley has a surprise of epic proportions! She’s giving away Power Poppy’s SOON-TO-BE-UNVEILED MARCH CLEAR STAMP SET RELEASE! That means EIGHT of the freshest, most fun Power Poppy designs to hit the market yet. It's a $144 value! Plus you can enter a friend to win.

Read all the details here!
Winners will be announced on the Power Poppy Blog/Instagram/Facebook on Sunday, March 12th, and also over on thedailymarker.com

Pop back over to the Power Poppy Blog for the full link list of today's huge hop!


Pretty incredible, right?  Can you imagine winning all eight....yes, eight new March release stamp sets?!!  Well, let me show you a quick peek at my card and then you can jet on over to read all about how to enter to win!

For my card, I chose to use the Power Poppy stamp set Short Stacks for my image.  For my sentiment, I chose one from Hero Arts' Trees, Birds, and Messages stamp set.  My image was stamped with Memento's Tuxedo Black ink and colored with Copics.  A little simple layering with some stitching and this card was ready in a snap!  :)


Those sweet little tulips get me every time!  And what about that darling cupcake?  :)


So that is all for my card today, but my Bloomie sisters all of beautiful cards to share with you so make sure you check them out and leave a little blog love while you are there!  Then...check out all of the blog hopping goodness back at the Daily Marker....there are oodles of amazing cards for you to see!  I thank Kathy Racoosin so much for including us in on this wonderful hop!  I had such fun and I hope you will too.  If you can, try to pop back in tomorrow for another card I have to share with you to introduce Power Poppy's March Power & Spark Challenge!  Until then, take care!  :)

Cindy Lawrence    
Julie Koerber 
Kathy Jones 
Katie Sims <------You are here 
Stacy Morgan 
Tosha Leyendekker

~Katie

Supplies not listed above:  Paper-PTI's Rustic White, Enchanted Evening card stocks, Echo Park's "The Story of Our Family" 6x6 paper pad, My Mind's Eye's "Love Me" 6x6 paper pad; Other-PTI's Heart Border die, Spellbinder's Long Classic Rectangles Large die set, and these Copic colors:  C00, C1, C3, C5, W2, BG0000, BG10, BG18, BG53, BG57, BG70, BG72, BG75, BG78, BG90, BG93, BG96, RV10, R14, RV21, RV23, RV25, RV29, R39, G20, G24, G28, B32, B34, B37, B39, Y26, Y32, E40, E42, E44.